Check out the full build video on YouTube!
IMPORTANT INFORMATION (Only for those laser cutting): The scale of the supplied SVG files may appear different in different programs so make sure the dimensions of the SVG files are the following:
Top wood panel: 279.4 * 149.4 mm
Side wood panel: 279.4 * 199.4 mm
If using an external laser cutting service, please also tell them that these dimensions are the correct ones, in case the file appears differently scaled in their software.
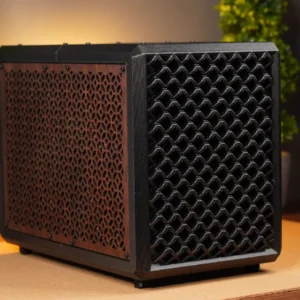
Good to know:
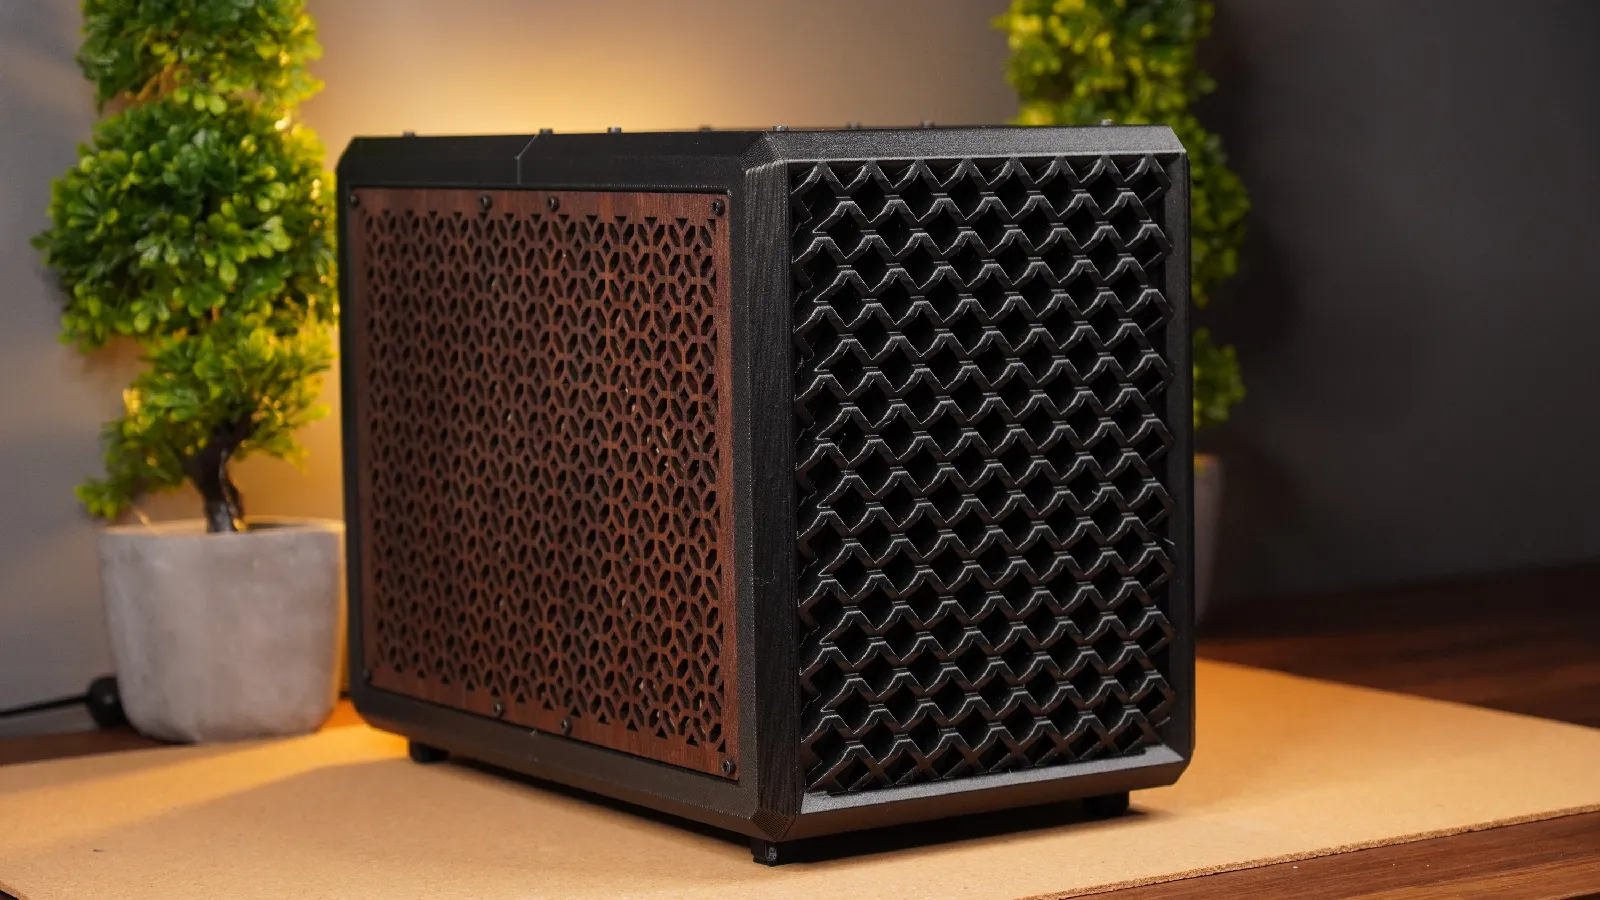
Case size: 320 x 240 x 190 mm
Filament used for the case in the pictures: FormFutura Carbonfil CF03 (PETG-CF)
Wood panels used: xTool’s 3mm Walnut plywood
You can print the side panels, or use the laser cuttable SVG files + printable STL files for a unique look like in the pictures.
Print bed required: 240x240mm (Use “SPLIT” side panel STLs for beds smaller than 280mm)
PC Component support:
ITX Motherboard and a suitable CPU that fits your motherboard socket.
2.5-slot Graphics card up to 295mm long.
120mm AIO Liquid Cooler
CPU Air Cooler up to 85mm height
SFX PSU (normal, not SFX-L)
Up to eight 92x15mm SLIM fans + one “normal” 120mm fan if not using AIO.
IMPORTANT: For the 92mm fans, you MUST use slim fans (15mm, or less thickness). Regular 25mm thick fans will not fit!
Parts required to build case: (Links coming soon)
27x M3 Threaded inserts (5mm long, 4.6mm OD)
27x M3 x 10mm screws
26x 8x3mm Neodymium magnets
OPTIONAL: Some type of glue compatible with plastics for magnets and body joints.
Tools required:
Soldering iron or other way of melting in place threaded inserts.
Printing the case:
Material recommendation: PETG, ABS, ASA (I used FormFutura CarbonFil CF03)
Filament usage: 1.5 – 2.0 KG (but may vary depending on your individual settings)
Print time: 40 – 80 hours (approx. 40 hours on a Creality K1 Max)
Supports: No
Custom slicer settings: No
All orange clickable links are “affiliate links” or “referral links” meaning I may earn a small commission on qualified sales at no extra cost to you.
Building instructions:
I recommend watching the full YouTube video (coming soon) before building this project.
Start by removing all the custom support material on the rear half of the main body. These just snap off using some pliers.
Align the two halves of the main body so they sit flush with each other.
Add 7 butterfly joints to the locations marked in the picture(s) below. These will hold the two halves together. For an extra secure fit you can use glue, or carefully melt the butterfly joints in place using a soldering iron. Use the tightest size that you’re able to fit.
The butterfly joints are available in 0.00 tolerance, 0.05 tolerance, 0.10 tolerance, 0.15 tolerance and 0.20 tolerances to ensure a tigh fit. Pay attention to the markings on the butterfly joint to know it’s tolerance. See picture above for explaination.
Heat up your soldering iron and grab some M3 threaded inserts. The case is designed for M3 threaded inserts that are 5 mm long and has an outer diameter of 4.6 mm.
Add threaded inserts to each of the locations in the photos below with yellow circles. The entire case requires a total of 27 threaded inserts.
Add 4 inserts into the motherboard standoffs, and 3 into the PCIe slot screw mount.
Add 8 inserts to the top of the case, 4 into each half.
Add 8 inserts into the removeable side panel. Also add 1 insert into each of the four feet.
Secure the four feet in place from the inside of the case using one M3x10mm screw for each foot.
Grab some 8x3mm neodymium magnets. Push the magnets into the chassis and side panels in the locations marked in the picture below. (Blue and purple circles)
Remember to take your time to ensure that the magnet polarity gets right between the side panel and the main body to ensure a properly attached side panel.
Also add eight more magnets to the locations shown in the picture below circled in blue. These will be used to secure two 92x15mm fans.
TIP 1: Use glue if the magnets are not held in place by the friction.
TIP 2: If the magnet holes are too tight, use some scissors to carefully scrape out the inside of the hole to make it slightly bigger. Make sure to scrape at roughly 90 degrees staight down so the hole does not get a concave shape.
If all the magnets are installed with the right polarity the side panel should just snap into place and hold itself flush to the main body like in the picture below.
The 9 steps shown above are pretty much all the necessary steps required to “build the case”. The rest of the build is pretty straight forward and will be similar to building in any other PC case, but there are a couple more steps to keep in mind.
The two 92mm fans next to the motherboard mount is helf in place by magnets. To mount the fans we need to first add computer fan screws to all four corners of each fan on the side of the fan facing the magnets. These screws are magnetic and will therefore stick to the magnets once dropped into place. (See picture below)
The rest of the components should then be attached in the order following the picture sequence below.
Motherboard + CPU cooler (Here using a 120mm AIO Liquid Cooler)
If using an AIO Liquid Cooler like in the picture above, it needs to be mounted to the bracket in the picture below.
The bracket can then slide into the front of the chassis and will latch itself securely into place. This bracket can also be used to mount a 120mm front intake fan if you’re using an air cooler instead, although I highly recommend using a AIO in this build due to it’s superb performance compared to a smaller air cooler.
Now we can install our GPU. (Here used a Gigabyte 3070, 286mm long, 2.5-slot)
Then we can add our SFX power supply, power button and necessary cables.
Reviews
There are no reviews yet.